 Loading... Please wait...
Categories
The R4 3DS Newsletter
- Home
- How To Use The Playstation VR PSVR On The PC
How To Use The Playstation VR PSVR On The PC
Not many people know this, but if you already have a Playstation VR / PSVR headset, you can use it right on your PC to play all of those amazing Steam VR games and Oculus games too. It's great to be able to do so as if you already have the PSVR, and have a capable PC, you don't have to go and buy a whole different VR Headset to be able to take advantage of the Steam VR games. Now, you can't do this right off the get go. You need a piece of software for your PC called Trinus PSVR software for Windows.

The PlayStation VR headset is one of the cheapest on the market, with Sony currently selling PSVR bundles for as little as $199.99. That’s perfect if you’re a PS4 gamer, but what if you’re platform agnostic and go from PS4 to PC too? You don’t want to fork out for a PSVR headset and then have to buy an Oculus Rift or HTC Vive to use on the PC, right?
While it’s not the best way to experience PC-powered VR games and experiences, there is a way that you can use your PlayStation VR headset on your PC, sans Motion controllers. You won’t be able to play room-scale games, but you should be able to enjoy Standing VR games that offer keyboard and mouse/controller support.
Either way, it’s worth a go, especially if one of your favourite games has VR support. Here’s how to set up and use PlayStation VR on your PC.
How to use PSVR on PC
The first step to using PlayStation VR is to download and install Trinus PSVR, the third-party software that allows your PC and your PSVR headset to ‘talk’ to one another.
- Head to the Trinus VR website and click Download Trinus PSVR to download the installer.
- Run the Trinus PSVR installer, and follow the on-screen instructions to install the software.

Once Trinus PSVR has been installed on your PC, the next step is to connect the headset and adjust the resolution settings – PSVR operates best at 1080p, so you’ll want to make sure that your display output matches this.
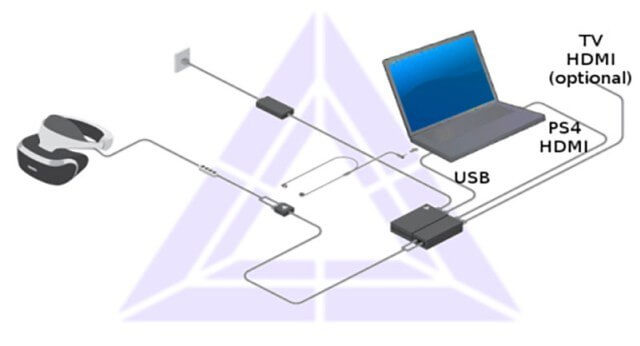
- Plug the HDMI cable into the PS4 HDMI port on the PSVR processing unit.
- Plug the other end of the HDMI cable into the HDMI port on your PC. If you only have DisplayPort available, you can pick up a HDMI-to-DisplayPort adapter on Amazon
- Plug one end of the USB cable into the processing unit, and the other into your PC – a USB 3.0 port, if possible.
- Plug your PSVR headset into the processing unit, and finally, plug the power cable into the power outlet.
- Press the power button on the inline cable remote to turn the headset on. The PC should then recognise the headset as a second display.
- On the PC, head to Settings > System > Display and, under the Multiple Displays subheading, select Extend these displays.
- Under Resolution, select 1920 x 1080.
- Click Apply.
Now that you’ve got your PlayStation VR headset hooked up to your PC, it’s time to configure Trinus PSVR and Steam VR to play your favourite Steam games.
- Right-click Trinus PSVR in the Start menu (or Desktop) and select Run as Administrator.
- Click Install. Trinus PSVR should then automatically find your Steam library.
- Click the Main tab, select the dropdown menu next to PSVR Display and select DISPLAY1.
- Click the dropdown menu next to PSVR Mode, and select VR. It’s worth noting that if you want to play standard 2D games in VR, you can select Cinematic mode.
- Click Assign button next to Reset View to bind a key on your keyboard to reset your view in PSVR. Unlike with the PlayStation, there’s no camera to capture movement information, so it all comes from internal sensors that can (occasionally) get the tracking a little wrong.
- If you want to be able to zoom while in-game using your mouse scroll wheel, make sure the checkbox next to Use Mouse Wheel is checked.
- Make sure that your PSVR is on a flat surface, and click Start to begin calibration.
- Right-click the Steam icon in the Start menu or on the Desktop, and click Run as Administrator.
- Select the VR icon.
- Click Run Room Setup > Standing Only > Next > Calibrate Center > Next > and enter your height in inches or cm in the height field. Then, click Calibrate Floor > Next > Done.
- If successful, you should see the SteamVR Home pop-up on your display in split view, ready for your PSVR headset. Simply make sure the window is highlighted and hit Windows key + Shift + Right arrow to move the window to the headset.
That’s it! You should now be able to play any Steam VR games that offer keyboard and mouse support. You may not be able to move around or physically interact with the environment like with the HTC Vive or Oculus Rift, but it’ll save you the hassle of buying a second headset just for use with PC.


