 Loading... Please wait...
Categories


The R4 3DS Newsletter
- Home
- R4 3DS Setup
- R4i Gold Pro Setup
R4i Gold Pro Setup
The R4i Gold Pro follows in the same footsteps as the R4 3DS Dual Core and the R4 3DS RTS (real time save) card. Installing the firmware works exactly as it does on all other R4 Cards. The big difference between any of the R4 3DS Firmware files are the files and folders that you have to copy over to your micro SD card. It is much like any other card when it comes to setting up the firmware kernel.
Updated January 10th, 2024 with full support for the newesr 11.17 3DS Update and 1.4.5 for the DSi

Just as you would with the firmware for the other R4 cards, you need to make sure that you put all of your files into the ROOT directory of your card.
All of our firmware files are compressed either in ZIP format or RAR format. You can download and use the shareware version of WinRar for Windows to uncompress the firmware. You may also use the freeware 7-Zip (which you can find in our downloads section) to decompress the archive as well. If you are a MAC OS X user, the built-in archive utility will uncompress all fo the files for you on your MAC.
Once you have uncompressed the archive, it may be in a folder with the same name as the firmware file archive itself. It is in that folder that you will find the files below. And these are the only files that should be copied over to your micro SD card, into the root of the card itself.
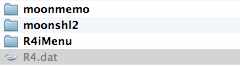
By root, we mean the micro SD card when you first click on the removable disk letter on your Windows or MAC PC. There should be no other file or folder in the main directory. Your uncompressed firmware may be in a folder of its own, but you want to go into that folder and copy over only the files and folders you see in the screenshot. These are the only files that you require for the firmware, and if they are NOT on the root of your micro SD card, you may very well be greeted with an ERROR message, asking you to turn of your 3DS or DSi console.
Every one of our R4 cards comes with a USB Micro SD Card reader/writer. If you have purchased one of our combo packages, you also received a micro SD card with your order. If you purchased your micro SD card elsewhere, please get it ready now.
- Insert the micro SD Card you plan to use with your R4 into the micro SD Card reader/writer and plug it into any available USB port on your desktop or laptop computer.
- Your computer will show you that you now have a new drive once you have plugged in the micro SD card. The drive letter will vary depending on how many hard drives or other flash media you have on your PC. It normally shows up as a removable drive.
- Click on this new drive letter, and it will bring up the main folder/root of your micro SD card. This is where you want to copy all of the firmware files for your RTS Card.
- Now drag and drop or copy and paste all of the files to your micro SD Card. Once copied over to your micro SD, your R4 card will have the required firmware files.
- Copy over any apps or games, music, etc.. to the micro SD that you want to use on your R4. We always recommend using folders to help you organize your card - but they are not necessary.
- Remove the microSD card from the micro SD reader and plug it into your R4 RTS as shown in the picture below.
- Put your R4 into your handheld game system, and turn it on. You'll see the card as one of the games on your main screen, and once you select it, you will be taken to the R4 RTS menu so that you can select the game, app, or media you would like to enjoy.

That's all there is to it. A simple quick and easy drag and drop/copy and paste is all you need to do it install the firmware kernel. Now all you have to do is enjoy your new R4 3DS Gold PRO Card!
All prices are in USD. Copyright 2026 R4 3DS. Sitemap | Terms And Conditions / Privacy Policy | Shipping And Returns | R4 3DS Affiliate Program


All prices on our website will be processed in US Dollars. We do offer some currencies as a selection for reference purposes but the final price will be charged based on our US Dollar pricing. Please note that exchange rates can change every day - sometimes many times per day, and that your final amount will always be charged in US Dollars. By completing your order you agree to the US dollar charge and the equivalent amount based on the exchange rate at the time of processing.
Please note that our Buy 2 Get 1 Free Promotion Does Not Include Micro SD Cards. In orders where you purchase a combo package with a micro SD Card, only the R4 cards themselves are eligable for the Buy 2 Get 1 Free or Buy 1 Get 1 FREE Promotion. Please note that our buy 2 get 1 free promotion is NOT applicable with orders where bulk or quanrtity discounts are in place. A Maximum of 10 Free R4 Cards in total will be shipped with your order. Wholesale orders are not part of the buy 2 get 1 free promotion due to the discount / wholesale pricing